Volunteer Portal Guide
Welcome! The Volunteer Portal is where Hillsboro Elks Lodge #1862 members sign up for volunteer shifts, keep track of their hours, and stay in touch with event coordinators. This guide walks you through everything from creating your account to logging your hours.
Part 1 — For all members
1. Create your account
You only need to do this once.
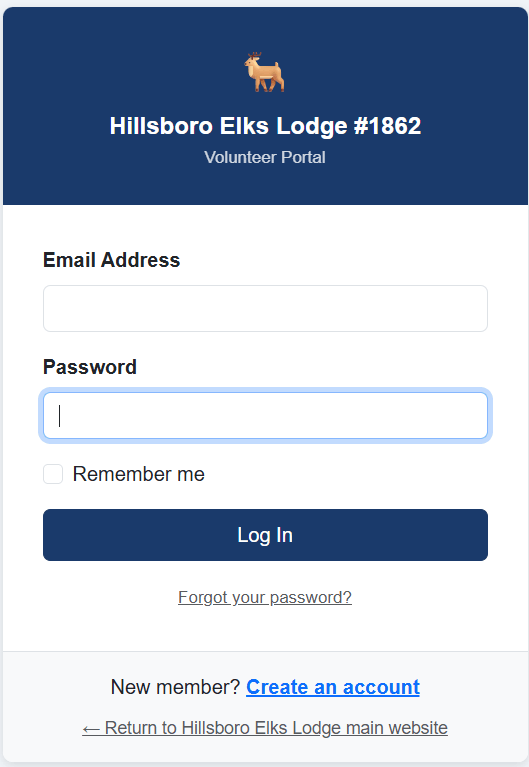
- Open the Volunteer Portal at hillsboroelks.org/volunteer. On the login screen, click Create an account.
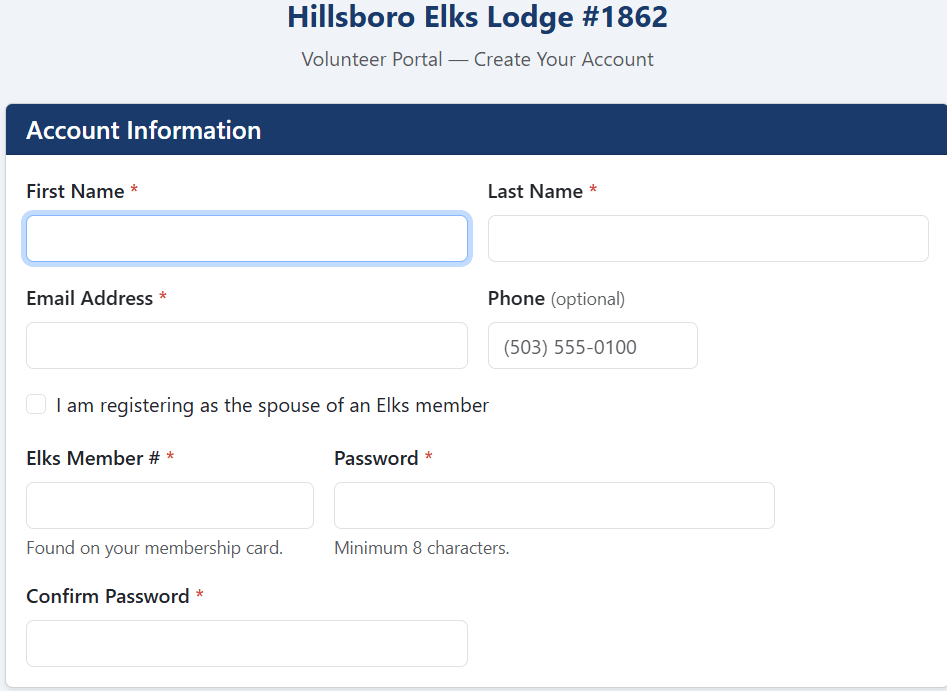
- Under Account Information, enter your first and last name, email address, and (optionally) your phone number. Choose a password of at least 8 characters.
- Enter your Elks Member #. It is on your membership card and is digits only.
- Registering as a spouse? Tick “I am registering as the spouse of an Elks member” and enter your spouse’s member number. Your account is created as a linked spouse account and has full volunteer access.
- Optional but helpful: check your Skills, your Volunteer Interests, and fill in the General Availability grid. Coordinators use this to match people to events. You can change all of it later.
- Click Request Account.
If you see “That Elks member number is already associated with an account,” someone (possibly you, earlier) has already registered with that number. Email the portal contact listed at the bottom of this guide and we will sort it out.
2. Log in
- Go to the portal and enter your email address and password.
- Tick Remember me if you are on your own device and do not want to log in every time.
- Click Log In.
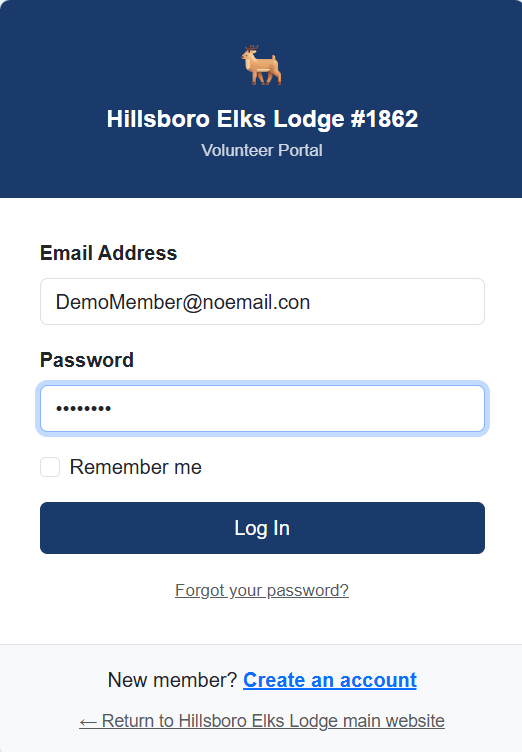
- Forgot your password? Click the link under the Log In button, enter your email, and we will email you a reset link.
- “Your account is pending administrator approval” means you registered but have not been approved yet. Please check back soon.
- To log out, click your name at the top right of any page and choose Log Out.
3. Your dashboard
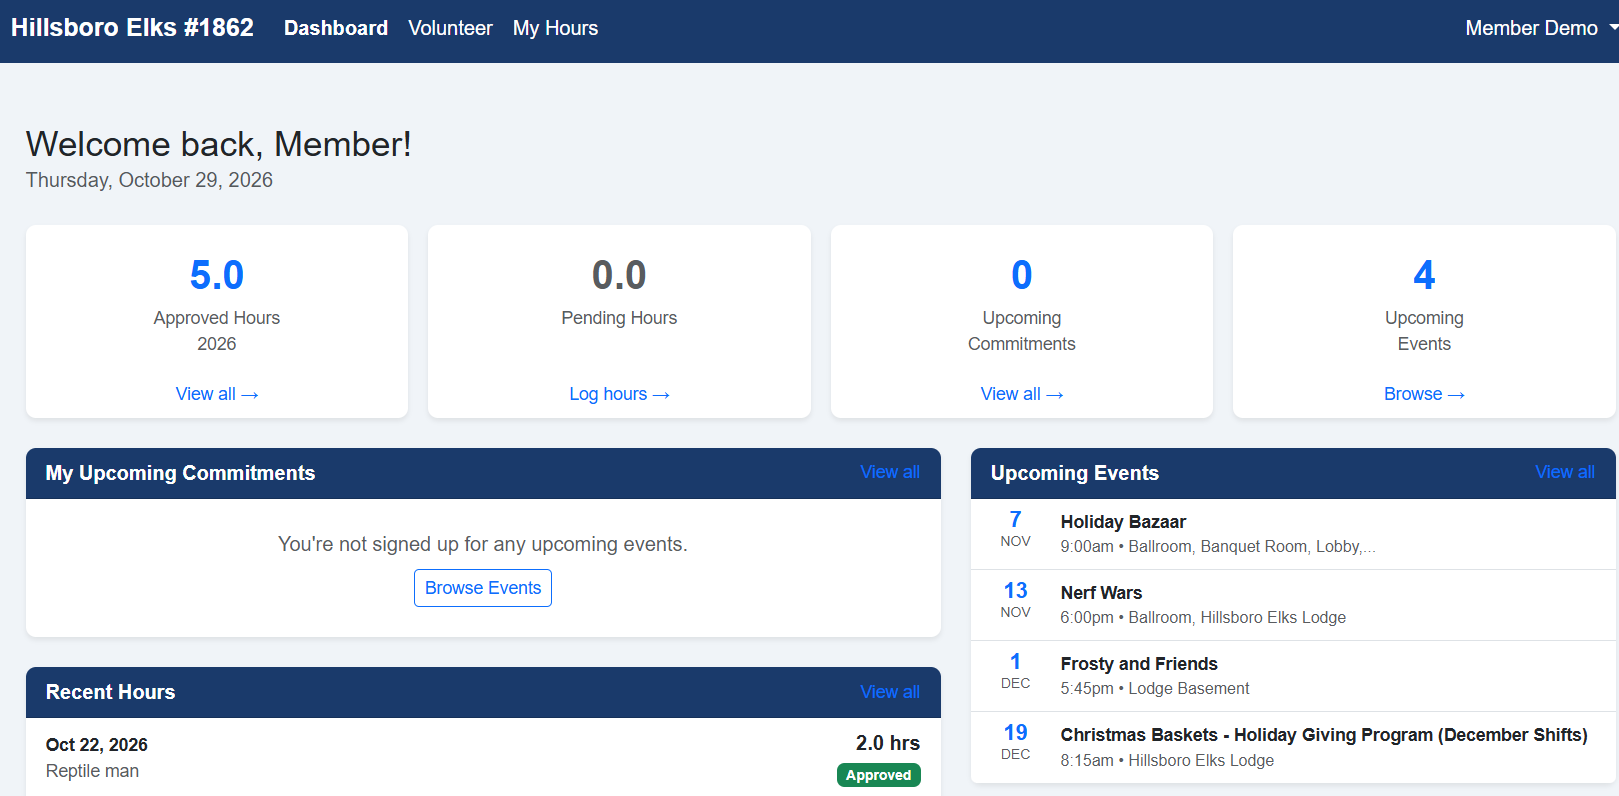
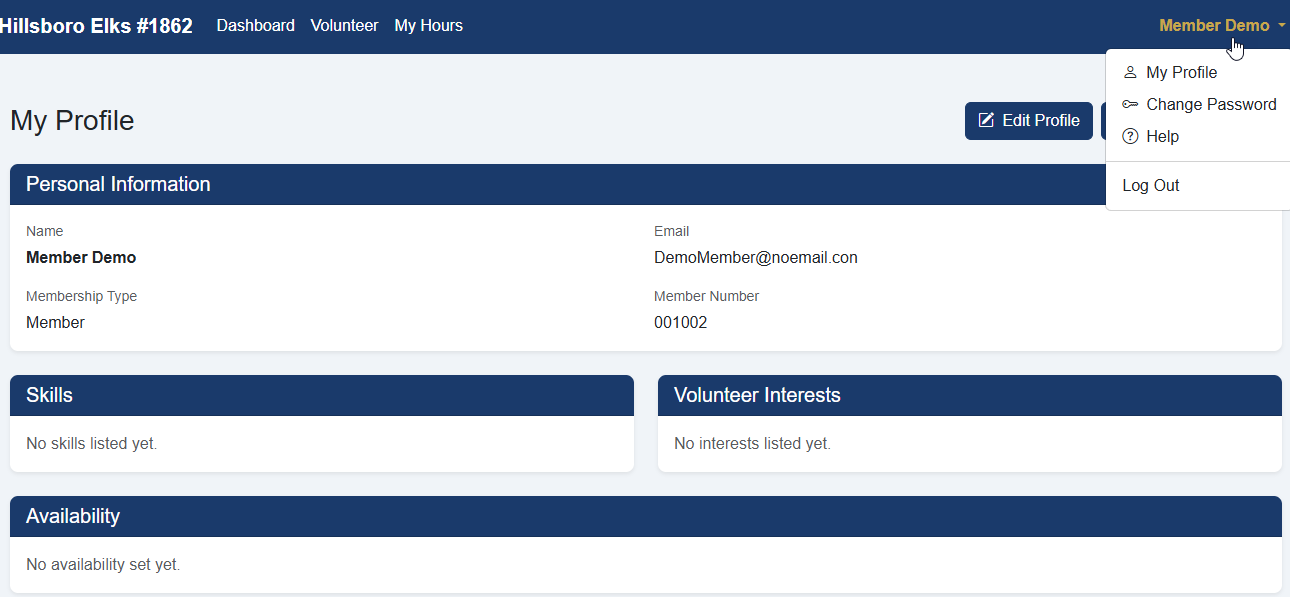
After you log in you land on the Dashboard, your home base. The menu bar across the top takes you everywhere else: Dashboard, Volunteer (browse and sign up), and My Hours. Click your name at the top right for My Profile, Change Password, Help (this guide), and Log Out. On a phone, tap the menu icon at the top right to open it.
What you will see:
- Stat cards across the top: your approved hours this year, hours still pending approval, upcoming commitments, and the number of upcoming events. Each card has a link to the matching page.
- My Upcoming Commitments: the shifts you have signed up for.
- Recent Hours: your latest hours entries and whether each is Approved, Pending, or Rejected.
- Upcoming Events: what is coming up at the lodge. Click one to go to the signup page.
- Quick Actions: shortcuts to browse opportunities, log hours, and update your profile.
4. Sign up for a shift
Click Volunteer in the menu to see every event that is open for signup.
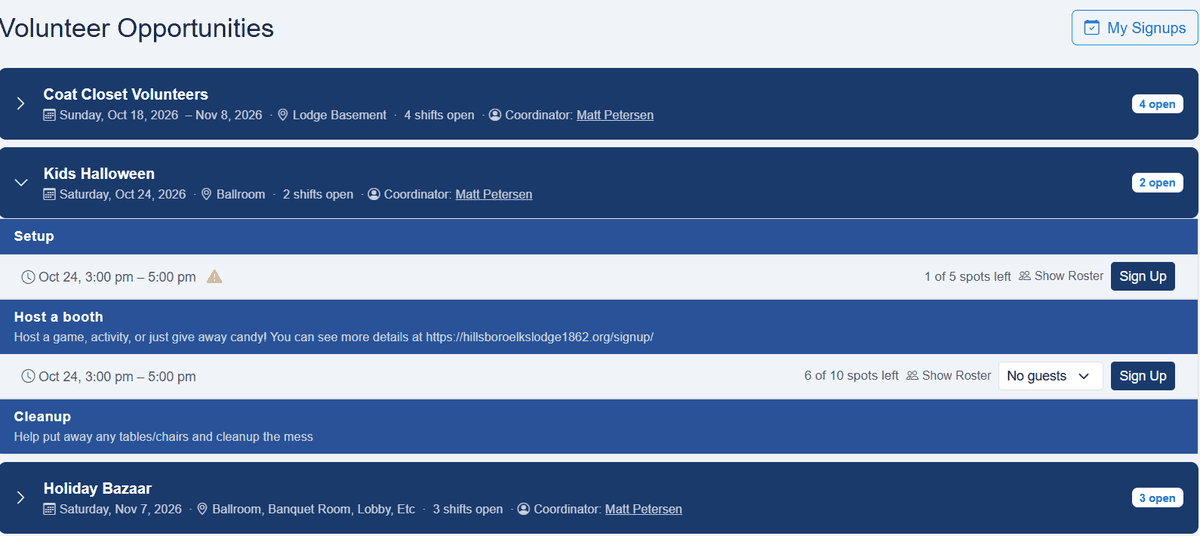
- Each event is a blue bar showing the date, location, how many shifts are still open, and the event coordinator. Click the bar to expand it.
- Inside you will see the volunteer roles (for example, Setup or Cleanup) and each role’s shifts: the date and time, what you will be doing, and how many spots are left.
- A yellow warning triangle on a shift means the work is physical (lifting, carrying, being on your feet).
- Click Show Roster to see who has already signed up.
- Click Sign Up. The row turns green and shows Signed up. You will also get a confirmation email.
Changed your mind? Click Cancel on that shift (or on the My Signups page). If it was full, the spot opens up for someone else.
Signing up your spouse
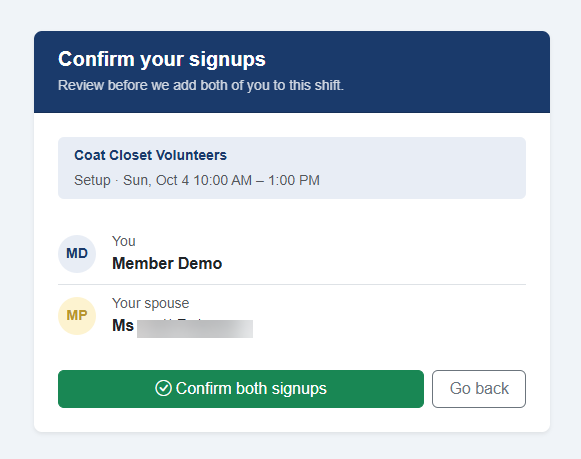
If your account is linked to your spouse’s, you will see an “Also sign up [name]” checkbox next to Sign Up. Tick it, click Sign Up, review the confirmation page, and click Confirm both signups. Your spouse is added to the shift and you can cancel their signup for them from My Signups.

Bringing family or friends
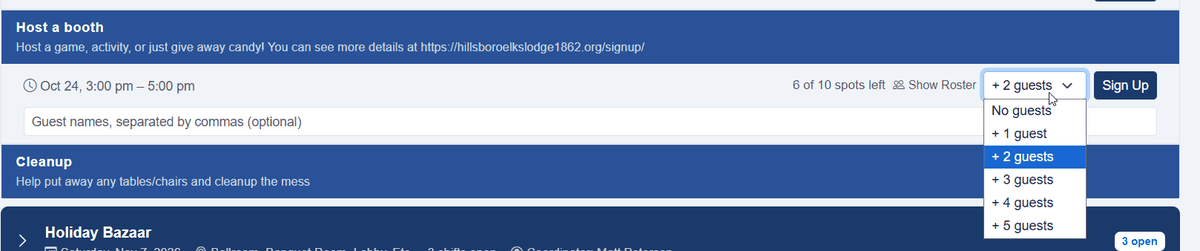
Want to bring your kids or other family members along? On any shift with at least two spots left, use the guests dropdown next to Sign Up.
- Choose how many guests are joining you (for example, + 2 guests if there will be three of you in total).
- A box appears where you can type their names, separated by commas. Names are optional but they help the coordinator. Anyone you do not name shows up as “[your name]’s guest.”
- Click Sign Up.
- Guests take up spots. If you sign up with two guests, three spots are used. Your whole group must fit; if it does not, nothing is booked and you will see how many spots are left so you can pick fewer guests or another shift.
- You can bring up to 5 guests per shift. They do not need to be Elks members.
- Guests do not have portal accounts, so volunteer hours are only credited to members. Please check the event description for any age or safety guidance before bringing children.
- Forgot to add someone? You can add or remove guests later from My Signups (next section).
5. My Signups
Click My Signups at the top of the Volunteer page (or the “View all” links on your dashboard) to see everything you have committed to.
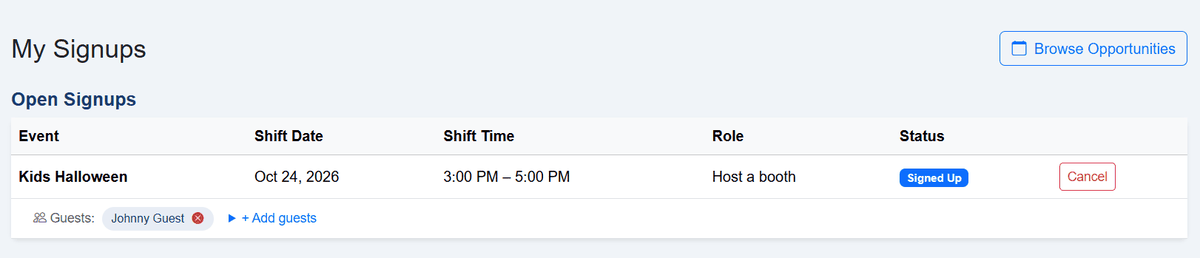
- Open Signups lists your upcoming shifts. Click Cancel to drop one. Cancelling your own signup also cancels any guests you brought.
- Guests appear under the shift they belong to. Click the small × on a guest to remove just that person, or + Add guests to bring more (if there is room).
- Signups You Made for Your Spouse appears if you signed your spouse up; you can cancel theirs from here.
- Completed Signups is your history, marked Attended once a coordinator confirms you were there.
6. Your volunteer hours
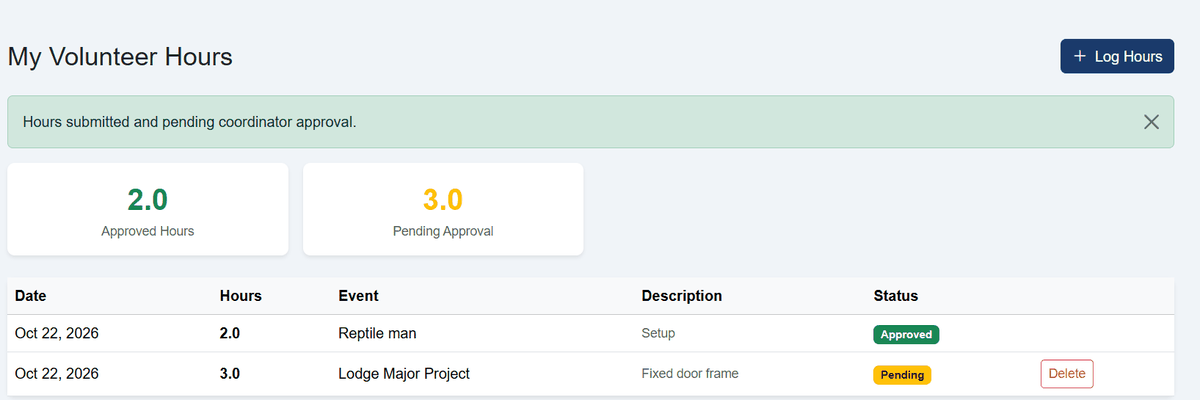
Click My Hours to see your totals and every entry. The two cards at the top show Approved Hours and Pending Approval. The table shows the date, hours, event or activity, and a status:
- Approved counted toward your total.
- Pending waiting for a coordinator to review. You can delete a pending entry if you made a mistake.
- Rejected not accepted. The coordinator’s reason is shown under the status, and you will get an email explaining it.
Two ways hours get recorded
Automatically, for shifts you signed up for. After the event, the coordinator marks who attended. When you are marked Attended, your hours are added for you, approved, based on the length of the shift. You do not need to log them again.
Manually, for everything else. Use this for volunteering that was not a portal shift, such as helping on your own time, committee work, or driving.
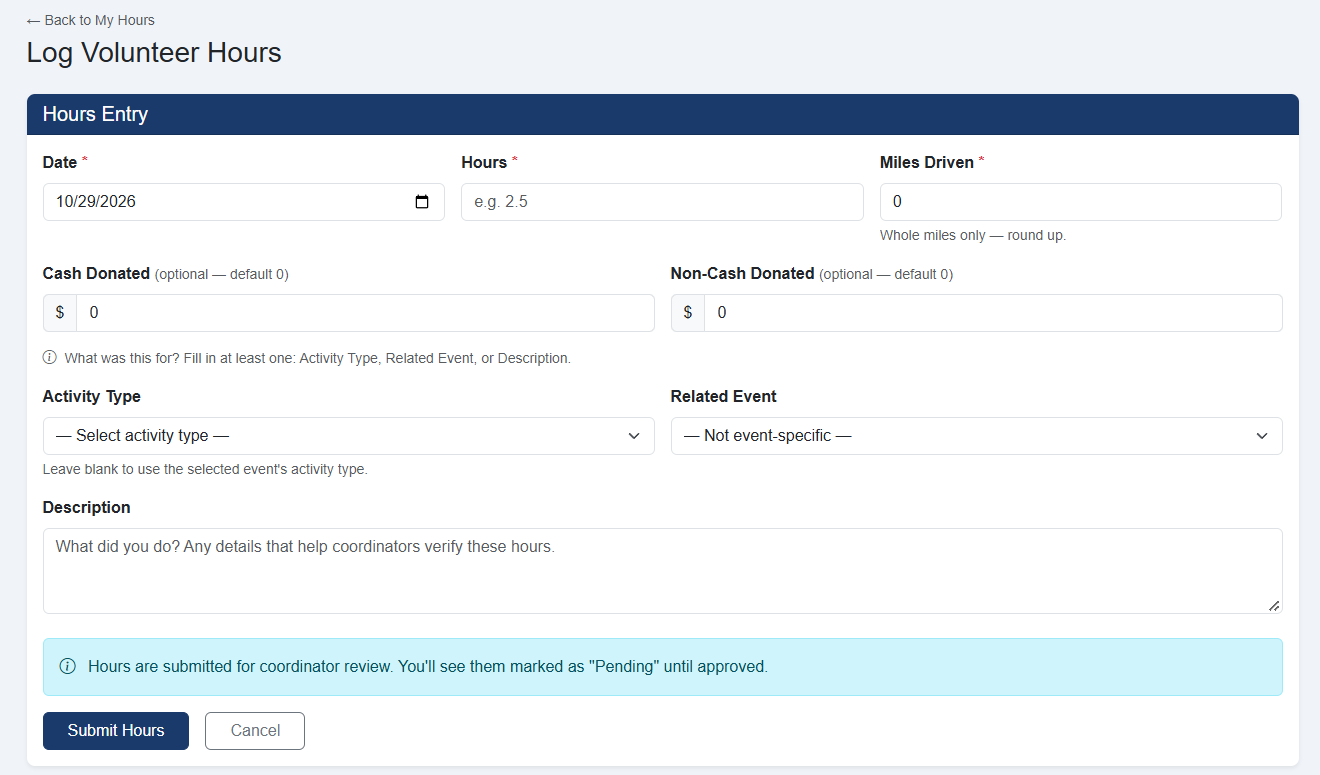
- On My Hours, click Log Hours (or use the Log Volunteer Hours quick action on your dashboard).
- Enter the Date (today or earlier) and the number of Hours. Hours can be entered in quarter-hour steps, such as 2.25.
- Enter Miles Driven in whole miles, rounded up. Enter 0 if none.
- If you donated, enter Cash Donated and/or Non-Cash Donated in whole dollars. Leave them at 0 otherwise.
- Pick an Activity Type and, if it relates to a lodge event, the Related Event. Fill in at least one of Activity Type, Related Event, or Description. If you pick an event and leave the activity type blank, the event’s activity type is used.
- Add a short Description of what you did. It helps the coordinator verify your hours.
- Click Submit Hours. Your entry shows as Pending until a coordinator approves it.
7. Your profile and password
Click your name at the top right, then My Profile, to see your information. From there:
- Edit Profile lets you update your contact details, address, emergency contact, skills, volunteer interests, availability, certifications (with expiry dates), and any notes you want coordinators to know.
- Change Password lets you choose a new password at any time.
Keeping your phone number and emergency contact current helps coordinators reach you when plans change.
8. Emails you will receive
- Account approved: you can now log in.
- Signup confirmation: right after you sign up for a shift.
- Reminder: the day before a shift you are signed up for.
- Hours approved or hours rejected: when a coordinator reviews hours you logged.
- Password reset: only when you ask for it.
If an email does not show up, check your spam or junk folder.
Part 2 — For coordinators
Coordinators have everything members have, plus a Manage menu for running events and reviewing hours. If you do not see Manage in your menu, ask an administrator to give you coordinator access.
9. The Manage menu
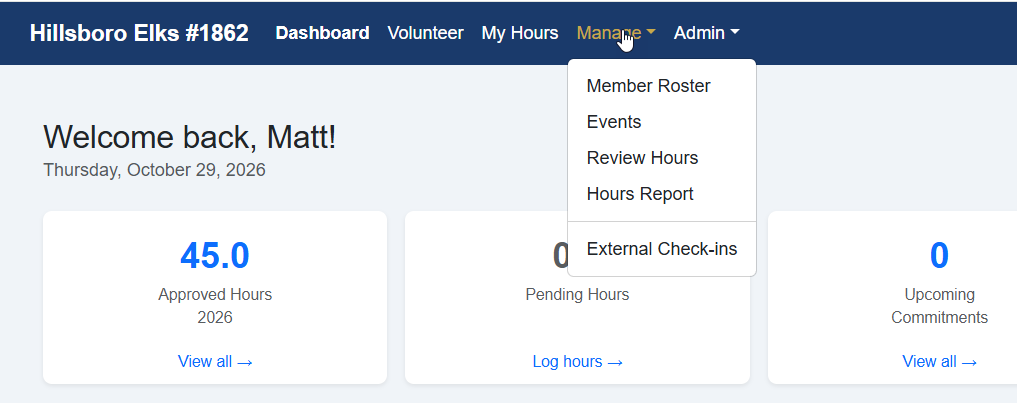
- Member Roster: search and view member profiles.
- Events: create events and manage their roles, shifts, and signups.
- Review Hours: approve or reject hours that members have submitted.
- Hours Report: totals by member for a lodge year or date range, with a download.
- External Check-ins: QR-code check-in for volunteers who are not members.
Your dashboard also shows an alert when hours are waiting for your review, with a Review Now button.
10. Create an event
- Go to Manage → Events and click New Event.
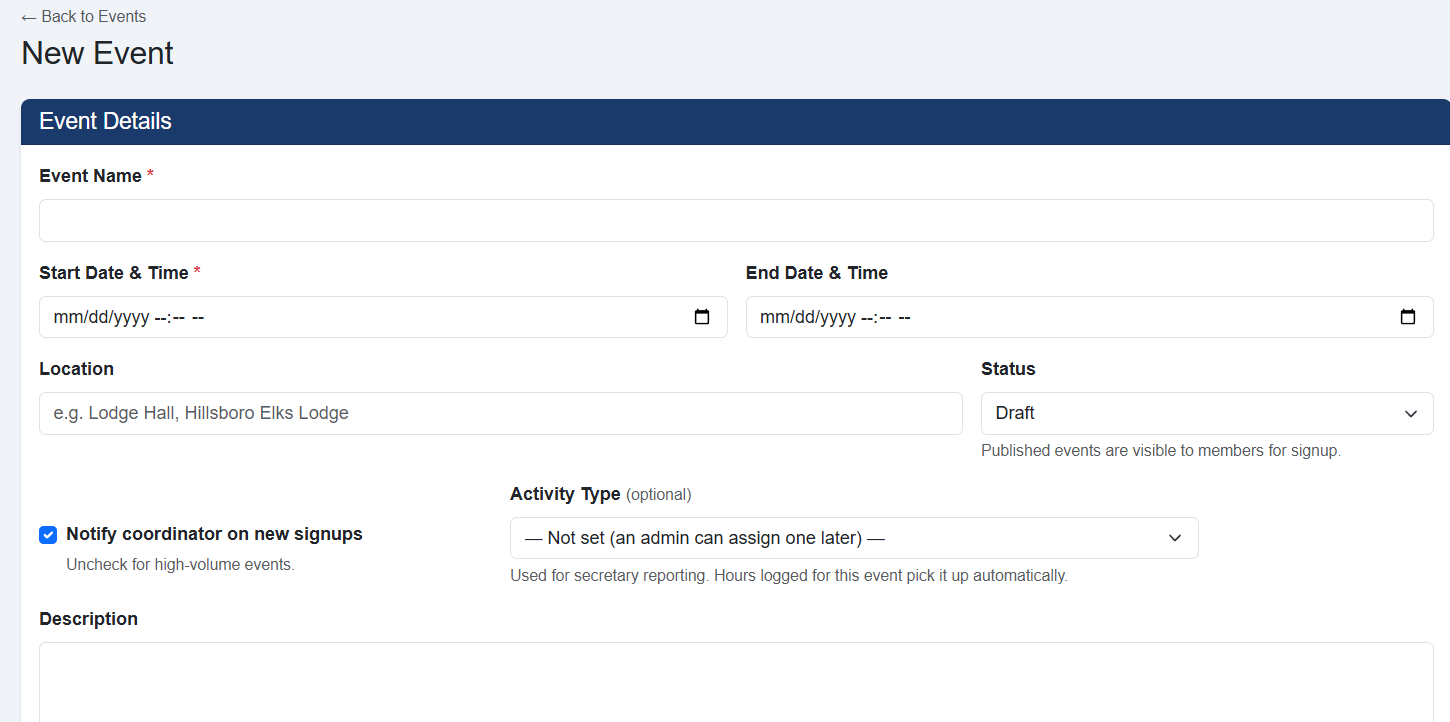
- Enter the Event Name, Start and optional End date and time, and the Location. Add a Description members will see, such as what to wear or bring.
- Optionally choose an Activity Type. The secretary uses it for reports, and hours logged for this event pick it up automatically. If you are not sure, leave it blank and an administrator can fill it in later.
- Set the Status. Draft keeps the event hidden while you build it. Published makes it visible to members for signup.
- Leave Notify coordinator on new signups ticked if you want an email for each signup. Untick it for busy events so your inbox stays manageable.
- Click Create Event.
Published events stay visible to members until the last shift has ended.
11. Add roles and shifts
An event is organized into roles (the jobs, like Setup, Kitchen, or Cleanup), and each role has one or more shifts (the time slots people sign up for).
- Open the event and use Add Volunteer Role. Give the role a title and a short description.
- Under the role, add a shift: Start and End time, Capacity (how many people you need), and optional Duties / Sub-role text. Tick Physical if the work is strenuous so members see the warning triangle.
- Click Add Shift.
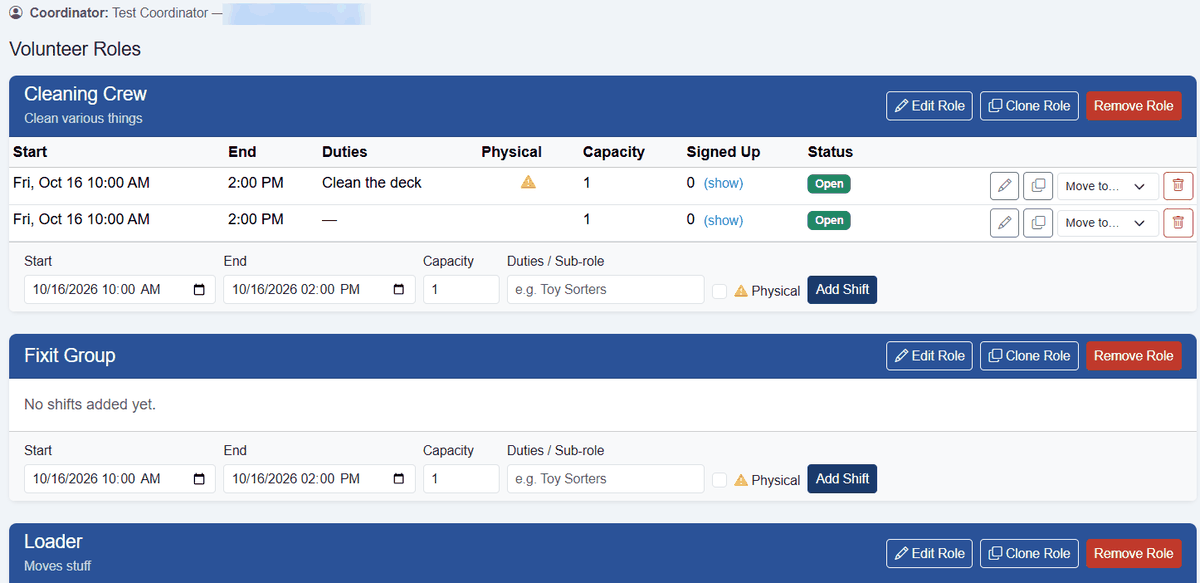
Time savers on the shift and role buttons:
- Edit (pencil) changes times, capacity, or duties. Lowering capacity below the number already signed up simply marks the shift full.
- Clone shift makes a copy one week later, handy for repeating weekly events.
- Clone Role copies a role and all its shifts on the same dates.
- Move to… moves a shift to a different role in the same event.
- Remove deletes a shift or role. You will be asked to confirm.
12. Watch signups and pencil people in
On the event page, the Signed Up column shows how many people have taken each shift. Click (show) to open that shift’s roster.
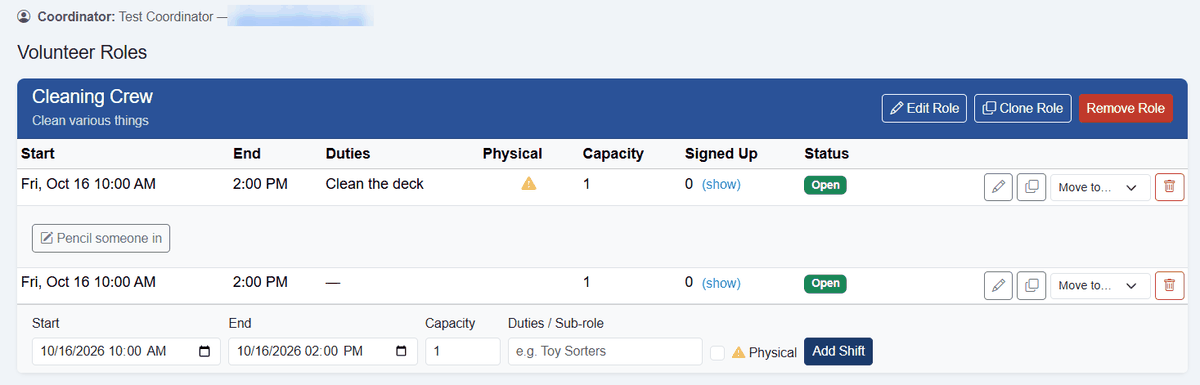
- Pencil in a member or guest. In the roster panel, search for a portal member or a past guest, or type a new name, and add them to the shift. This works even if the shift is full, so you stay in control on the day.
- Family guests that members bring themselves appear in the roster with a yellow Guest badge and the name of the member they came with. They count toward capacity.
- Link to member. If a guest turns out to have a portal account, click Link to member to attach the entry to that person so their hours are credited.
13. Take attendance
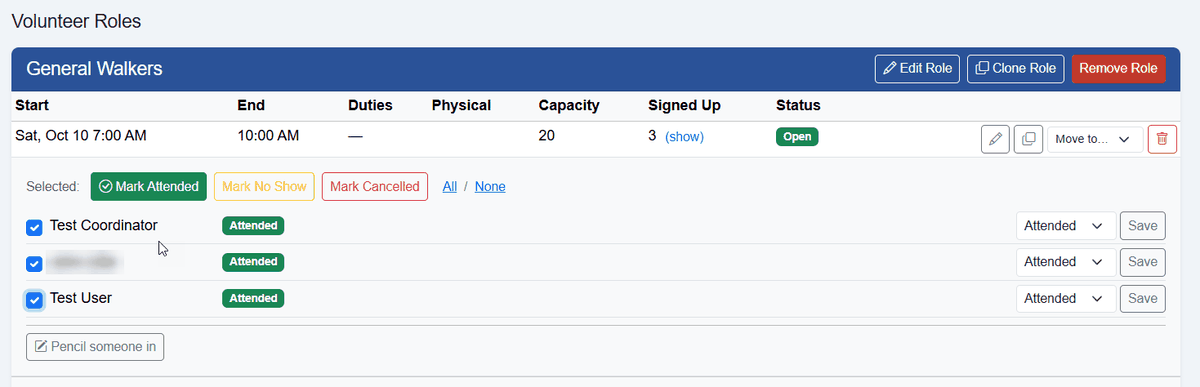
- After the shift, open the roster for that shift on the event page.
- Tick the people who came (use All / None to speed it up) and click Mark Attended. Use Mark No Show or Mark Cancelled for the others. You can also change one person at a time with the dropdown beside their name.
14. Review and approve hours
Go to Manage → Review Hours. Hours that members logged themselves wait here as Pending.
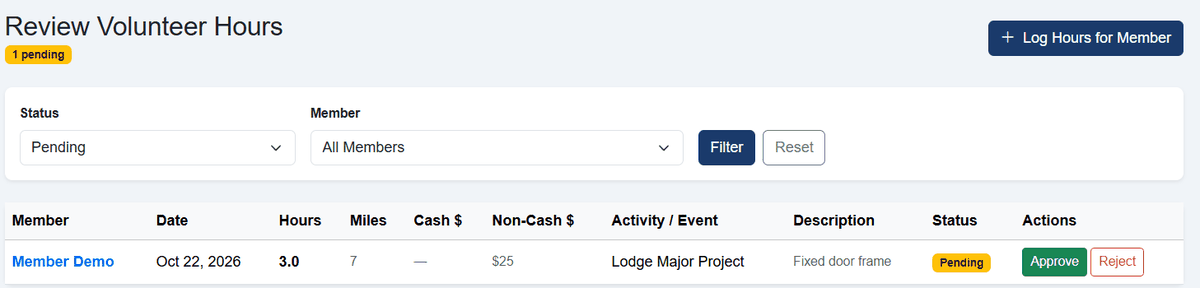
- Use the filters to narrow the list by status or by member, then click Filter.
- Click Approve to accept an entry. The member gets an email.
- Click Reject and enter a reason. The member sees your reason on their My Hours page and in an email.
- Log Hours for Member (top of the page) lets you enter hours on someone’s behalf, for example when a member cannot use the portal. Entries you create can be saved as already approved.
15. Hours report and export
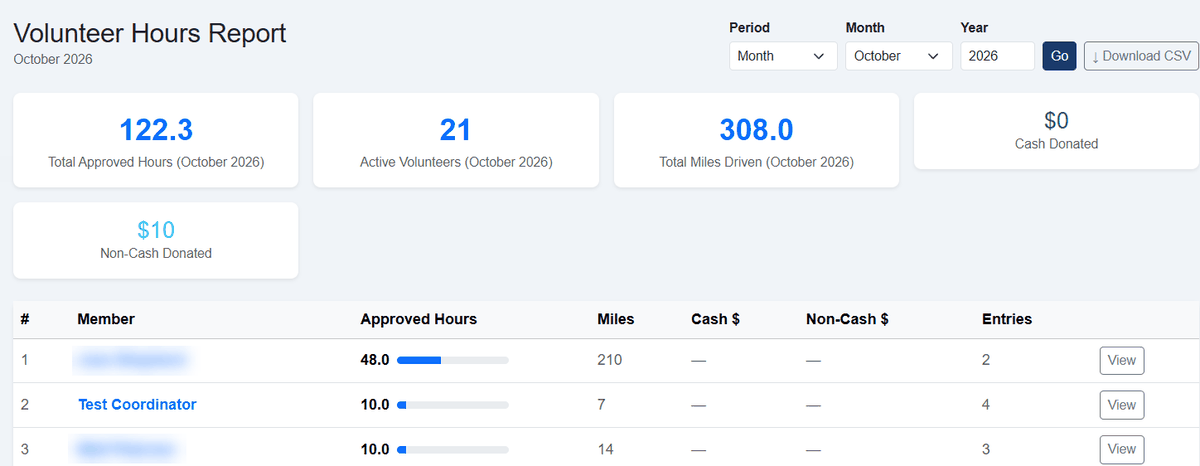
Go to Manage → Hours Report to see total approved hours for each member over a chosen period. Choose a Period of Lodge Year or Month, pick the year or month, and click Go. Click Download CSV to open the data in Excel or Google Sheets for the secretary.
16. Volunteers who are not members
For events with outside volunteers, such as a school group, use External Check-ins instead of creating accounts for everyone.
- Go to Manage → External Check-ins and click New External Event.
- Enter the event name, date, and location. Optionally set a Default Organization (for example, the school) so it is pre-filled for volunteers.
- Choose the Hours Mode. Open lets each volunteer enter their own hours. Fixed gives everyone the same number of hours that you set.
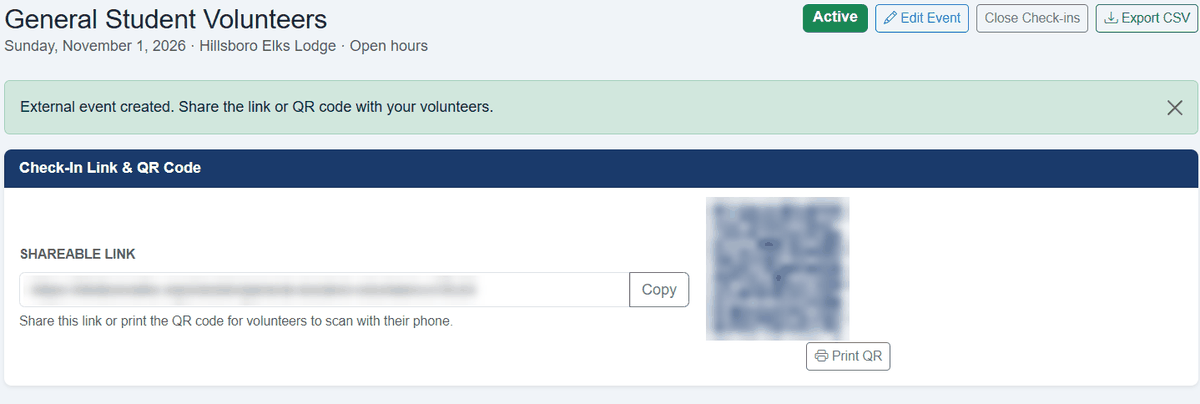
- Click Create Event & Get Link. You will get a shareable link and a QR code. Use Print QR to print it for the event.
- Volunteers scan the code with their phone and check themselves in; no account is needed.
- On the event page, approve or reject each check-in. Use Close Check-ins when the event is over, and Export CSV to download the list for your records.
Still stuck?
Email pr2@hillsboroelkslodge.org and include what you were trying to do and any message you saw on screen. Please do not include your password in an email.